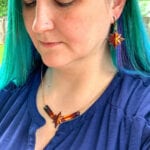
DIY Captain Marvel Jewelry
Create fun fanmade jewelry with a printer and shrinky dink paper!
Equipment
Ingredients
- Shrink Paper
- Dimensional Magic
- Jump Rings
- Earrings
- Chain
- Captain Marvel Image
- Scissors, Pliers, Hole Punch, Flat spatula
Instructions
- Preheat oven or toaster to 300 degrees F. Line a baking sheet with Parchment paper and set aside.
- Print the Captain Marvel image on the Shrink Film paper. I used my Cricut Maker as a Print and Cut file (Complex settings, see notes for cut settings) You will need to resize and position the image. Just remember that the pieces will shrink to 50% the size.

- Cut the images from the Shrink Film Paper. Punch a hole in the marked area. You MUST do this before baking.

- Place the pieces on your prepared baking sheet. Make sure they are not touching each other and won't if they start to curl.

- Place in the oven for 1-2 minutes. Open to see if your design curled. If it did, take a flat spatula and flatten the design and heat an additional minute.

- Sand any sharp edges or excess plastic from the design. I used a nail file.
- Allow cooling before applying the dimensional magic. Heat will cause it to crack. Flood the medium over the design. Use a toothpick to pop any bubbles and clear the whole so you can put the jump ring on.

- Allow to dry for 24 hours or until the medium is completely hard. You'll be tempted to touch and feel but don't until at least 3 hours. The medium hardens slowly and you will leave fingerprints in the design.
- Once your design is complete use the jump rings to secure your design to the earrings and chain. I used gold to match the star.

Notes
If you are using a cutting machine you will need to change your cut settings to make sure the blade cuts through the design.
Cricut Settings:
- Acetate
- 350 Pressure
- 4x multicut
- More pressure
- Fine point blade